Soundshape User Manual
General Operation
Soundshape's primary purpose is to output sound. It has virtual MIDI inputs and as it receives input notes, it will play various sections of its spectrum.
Modes of Operation
Soundshape has two major modes of operation:
- Plugin
- Runs as a VST plugin in a Digital Audio Workstation (DAW) or other VST compatible host. Soundshape will receive all MIDI input from the DAW and output its audio to the DAW. Check your DAW user manual for more information about how to set up a VST plugin instrument.
- In this mode, the DAW can directly record the software's output and also allow the user to route the output through other plugins. (Try applying a reverb effect to Soundshape!)
- Soundshape's parameters ( such as its volume and envelope) can be automated from the DAW or controlled with a MIDI controller with your DAW's MIDI-Learn feature.
- Standalone
- Runs as a standalone application. In this mode, Soundshape will have an
Optionsbutton at the top of its window. This presents options for selecting your MIDI input device, audio output device, and a buffer size. Samller buffer sizes lead to lower latencies, so try changing this setting if you feel like there is too much lag between playing a note and hearing its sound. - This mode supports JACK Audio output if JACK is installed and running on your system.
- In this mode, use the
Optionsbutton at the top to confiugre your audio settings and choose MIDI input sources.
- Runs as a standalone application. In this mode, Soundshape will have an
Soundshape works best with small buffer sizes ( choose buffers that give about 5 milliseconds or less). However, if your sound is popping or crackling, try increasing the buffer size until it goes away.
User Interface Overview
Brief descriptions of each of the components from above:
- Menu Bar
- Contains settings for Soundshape, like activating an on-screen keyboard and showing help.
- Frequency Domain
- This windows shows you spikes for each frequency that makes up the currently selected region of sound.
- Zoomed-In/Zoomed-Out Time Domain
- The bottom windows shows the entire interval of time you can edit. It has buttons at the bottom that let you select a region. This region appears in the zoomed-in portion. You select a portion of this region to edit in the frequency domain. Also contains a double-sided slider that controls which regions of sound get played.
- MIDI Panic
- Turns off all currently active MIDI notes.
- Import Audio
- Prompts for a file to analyze the frequency content of. This overwrites all your frequency domain data with the Fourier Transform of the input audio.
- Volume
- Makes Soundshape louder or softer.
- Export
- Write the entire time domain to an audio file.
- Sustain Play
- Plays the current fundamental frequency using the current play region. Sustains until clicked again.
- Play
- Also plays the sound, but only until released.
- Preset Box
- Browse presets in the currently configured directory. The write button prompts you to save your current presets as XML files.
- Envelope
- Changes the dynamics of your sound at different points of being activated and released on the keyboard.
- Fundamental Frequency
- Which note is played by the play buttons
- Add button
- Displays dots in the frequency domain to add spikes that you can slide.
- Harmonic Button
- When this active, the Add button only shows dots in places that would be harmonics of 440Hz.
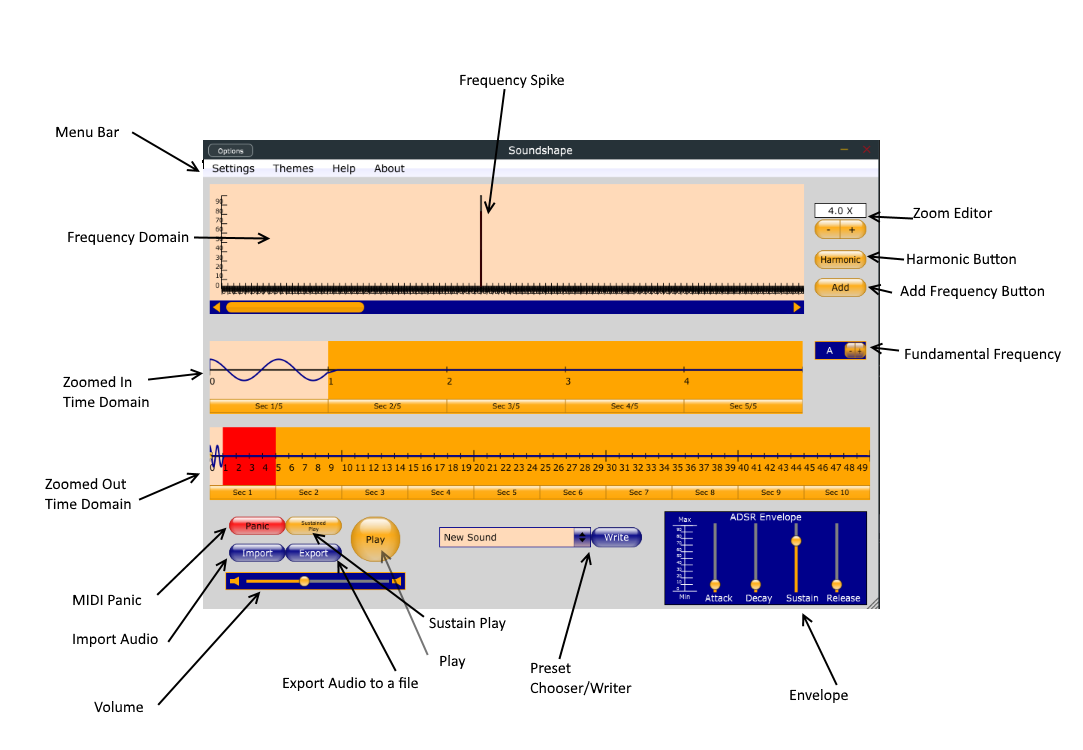
- Zoom Editor
+and-buttons increase or decrease zoom in the frequency domain. You can also type in a zoom level into the box.
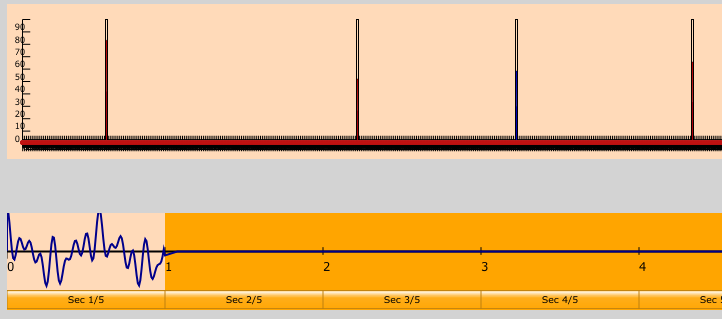
Soundshape features two time-domain veiws of your data, as you can see in this part of the interface.
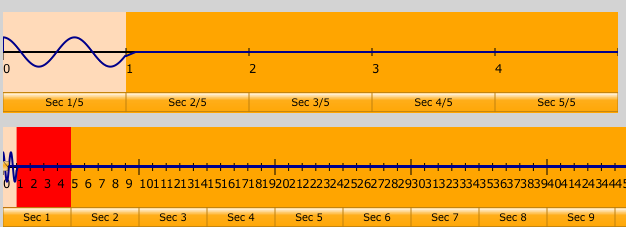
The window at the bottom shows you the entire sound wave that Soundshape can generate. It is broken down into 50 sections. There is a slider with two handles that you can drag over the region of time that you want to play.
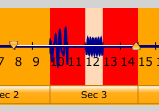
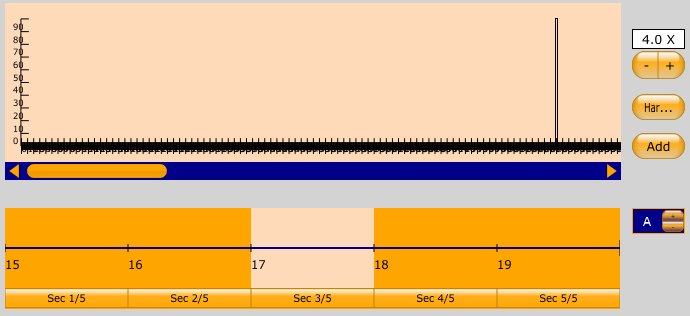
The window above it is a zoomed-in time-domain view. It shows you the portion of the bottom window that's highlighted in red. You can click on the button of a section of the zoomed-out window to change the section shown in the top window. Then, you can click on a button of a section in the top window to highlight it. This screenshot shows the 3rd little section of the 4th big section selected:
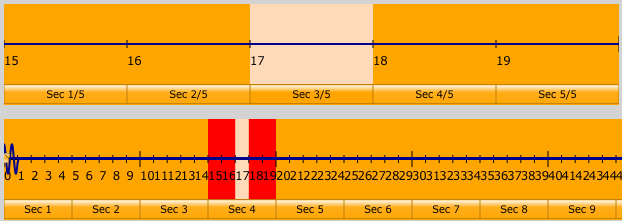
The tan portions represent the same time interval.
When you select a section of audio like this, the window at the top changes to show the frequencies that make up this audio. Right now, we have a section of silence selected, so theres only 1 bar appearing, and it's at zero.
New frequency spikes can be added with the Add button. Press the + and - buttons to zoom in and out of the frequency-domain window.

To build a sound out of harmonic frequencies, click the Harmonic button. When you're adding frequencies with harmonic mode enabled, you can only add harmonics of 440 Hz. In the editor, harmonic frequencies will show up red, and all others will show up as blue. Soundshape will assume that the fundamental frequency of your sound is 440 Hz, so it's a good idea to always have the first harmonic be nonzero.
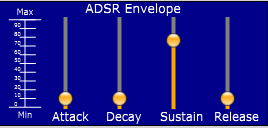
In addition to editing the spectrum of your sound, you can edit its envelope. The envelope is controlled by four parameters:
- Attack
- How long it takes the sound to fade in when you press a key. Make the attack small to make your sound "punchier."
- Decay
- How long it takes the sound's volume to reach the Sustain level.
- Sustain
- The volume that a sound remains at while its key is being held.
Release
- How long it takes the sound to fade out once you've released its key.
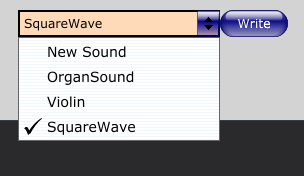
Soundshape is capable of saving and loading presets so you can always recall a sound you were working on. There are two types of presets:
- DAW presets
- If you save your preset in a DAW, then the DAW can load that preset back into Soundshape.
- Built-in presets.
- You can use the
Writebutton to save your current sound as a preset. Make sure your preset is saved with the.xmlextension when asked. - The built-in presets in the current preset directory will show up in the preset selector. To change which directory you are loading presets from, got to
Settings -> preset file path.
- You can use the
Finally, Soundshape features an Import and Export button that can be used to render Soundshape's time domain data to an audio file or to read an audio file and change your current sound's spectrum to try to match it. Supported file types are .ogg, .wav, and .flac.
For more help, you can watch the Soundshape tutorial videos.